How To Do A Bulgarian Split Squat: Master This Killer Leg Exercise
Want to build stronger, more balanced legs with an exercise that can be done almost anywhere? Look no further than the Bulgarian split squat! This move is like the unsung hero of lower body workouts, and today we’re breaking it down step by step so you can crush it in your next session. Whether you're a gym veteran or just starting out, this guide will help you nail the form and get the most out of this awesome exercise.
Let’s face it, leg day doesn’t have to be a nightmare. The Bulgarian split squat is one of those exercises that challenges your strength, stability, and endurance all at once. It’s not just about lifting weights; it’s about mastering your body mechanics to avoid injury and maximize results. So, if you’re ready to step up your leg game, keep reading.
Before we dive into the nitty-gritty, let’s set the stage. This exercise is versatile, effective, and honestly, kinda fun once you get the hang of it. Whether you’re working out at home, in the gym, or even outdoors, the Bulgarian split squat can fit seamlessly into your routine. Plus, it’s super scalable—meaning you can adjust the difficulty based on your fitness level. Sounds good, right? Let’s get started!
Read also:Got Sole Chicago 2024 Your Ultimate Sneakerheads Gathering
What is a Bulgarian Split Squat Anyway?
A Bulgarian split squat is basically a one-legged squat variation that targets your quads, glutes, and hamstrings while also improving balance and stability. Think of it as a lunge on steroids. You perform it by elevating one foot behind you (usually on a bench or box) and then squatting with the other leg. It’s simple in theory but challenging in practice—and that’s what makes it so effective.
This exercise isn’t just about building muscle; it helps correct muscle imbalances, improves core strength, and enhances overall athletic performance. Plus, it’s a great way to mix things up if you’re tired of the same old squats and lunges.
Why Should You Do Bulgarian Split Squats?
Here’s the deal: the Bulgarian split squat isn’t just another fancy exercise. It’s a game-changer for anyone looking to boost their lower body strength and functional fitness. Let’s break down why it’s worth adding to your routine:
- Improved Balance: By working one leg at a time, you engage stabilizing muscles that aren’t always activated during bilateral exercises.
- Targeted Muscle Activation: The split squat hits your quads, glutes, and hamstrings hard, making it a fantastic full-leg workout.
- Core Strength: Maintaining proper form requires a strong core, which translates to better posture and reduced risk of injury.
- Versatility: You can perform it with bodyweight, dumbbells, kettlebells, or even barbells, depending on your goals.
And let’s not forget the mental benefits! There’s something incredibly satisfying about mastering a challenging movement like this one.
Step-by-Step Guide: How to Do a Bulgarian Split Squat
Now that you know why this exercise rocks, let’s talk about how to do it properly. Follow these steps to ensure you’re getting the most out of your Bulgarian split squats:
Step 1: Set Up Properly
Read also:King Noodle Cedar Park The Ultimate Spot For Flavorful Ramen
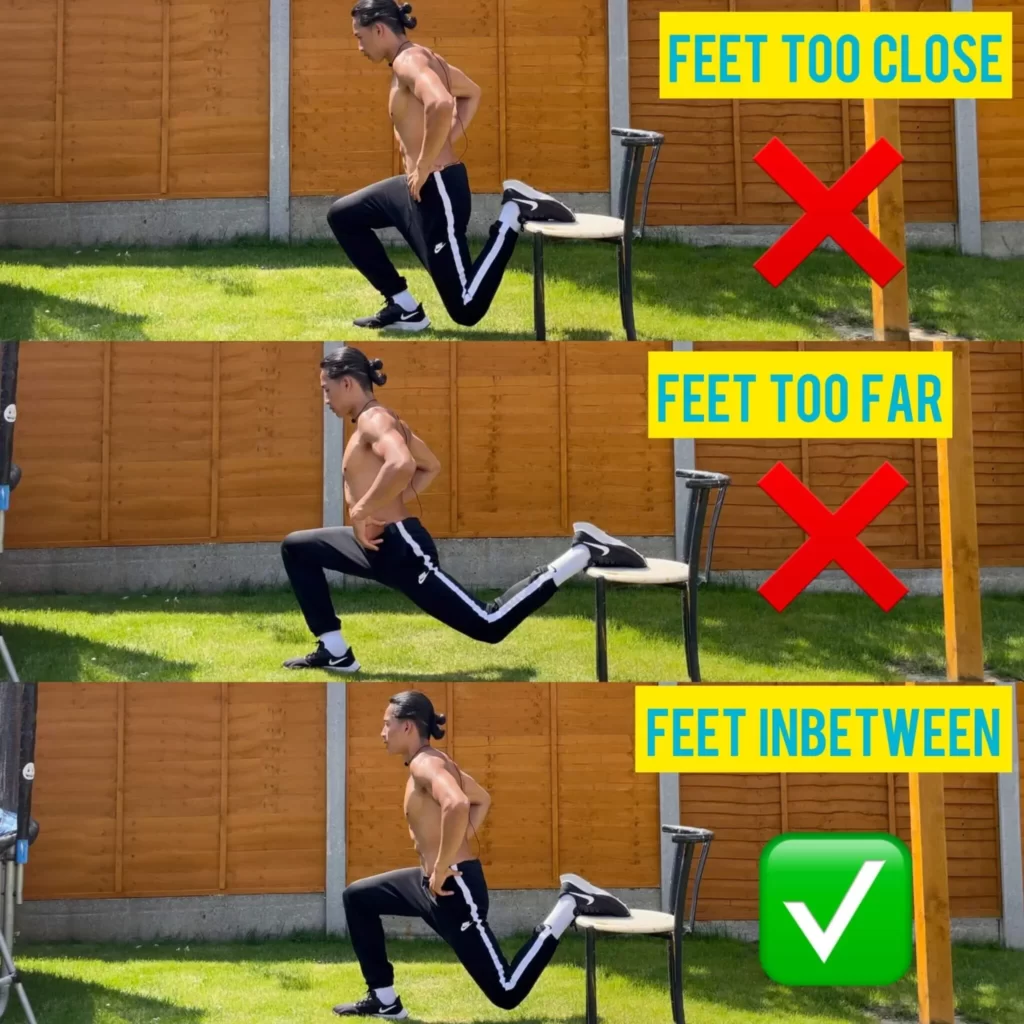
Stand facing away from a sturdy elevated surface like a bench or box. Place one foot on the surface behind you, keeping your toes pointing down for stability. Your front foot should be far enough forward that when you lower into the squat, your knee stays behind your toes.
Step 2: Engage Your Core
Before you start moving, brace your core to stabilize your body. This will help maintain balance and protect your lower back throughout the movement.
Step 3: Lower Into the Squat
Bend both knees and lower your back knee toward the floor. Aim to get your front thigh parallel to the ground while keeping your torso upright. Avoid letting your front knee collapse inward—keep it tracking over your toes.
Step 4: Push Back Up
Drive through your front heel to return to the starting position. Focus on squeezing your glutes at the top of the movement to fully engage those muscles.
Step 5: Switch Sides
Repeat the same number of reps on each side to ensure balanced development.
Common Mistakes to Avoid
Even though the Bulgarian split squat looks straightforward, there are a few common mistakes that could hinder your progress or lead to injury. Here’s what to watch out for:
- Letting Your Knee Collapse: Your front knee should stay aligned with your toes. If it caves inward, it puts unnecessary stress on your joints.
- Leaning Too Far Forward: Keep your torso upright to maintain proper alignment and avoid straining your lower back.
- Using Too Much Weight Too Soon: Start with bodyweight or light dumbbells until you’ve perfected your form. Progress gradually to heavier loads.
- Not Going Low Enough: To fully engage your muscles, aim to get your front thigh parallel to the ground. Half-reps won’t give you the same benefits.
By being mindful of these pitfalls, you’ll be able to perform the exercise safely and effectively.
Benefits of Bulgarian Split Squats
There’s a reason the Bulgarian split squat has become a staple in many fitness routines. Here are some of the top benefits:
1. Enhanced Stability
Because the Bulgarian split squat is a unilateral exercise (working one leg at a time), it challenges your balance and stability more than traditional squats. This translates to better coordination and reduced risk of injury in everyday activities.
2. Muscle Imbalance Correction
Most of us have a dominant side, which can lead to muscle imbalances over time. By isolating each leg, the Bulgarian split squat ensures both sides get equal attention, helping to even things out.
3. Full-Body Engagement
While the primary focus is on your lower body, the Bulgarian split squat also engages your core, shoulders, and upper back—especially if you’re holding weights. It’s truly a full-body workout in disguise.
4. Scalability
Whether you’re a beginner or an advanced lifter, the Bulgarian split squat can be adapted to suit your needs. Start with bodyweight and gradually add resistance as you get stronger.
How to Progress Your Bulgarian Split Squats
Once you’ve mastered the basic form, it’s time to step things up. Here are some ways to progress your Bulgarian split squats:
- Add Weight: Use dumbbells, kettlebells, or a barbell to increase resistance.
- Increase Range of Motion: Lower yourself deeper into the squat to engage more muscle fibers.
- Try Different Variations: Experiment with variations like the reverse Bulgarian split squat or single-leg deadlifts to keep things interesting.
- Increase Reps: If you’re focusing on endurance, boost the number of reps per set.
Remember, progression should always be gradual. Push yourself, but don’t sacrifice form for the sake of lifting heavier weights.
Sample Workout: Incorporating Bulgarian Split Squats
Not sure how to fit the Bulgarian split squat into your routine? Here’s a sample workout to get you started:
- Warm-Up: 5-10 minutes of dynamic stretching and mobility work
- Bulgarian Split Squat (Bodyweight): 3 sets of 10 reps per leg
- Bulgarian Split Squat (Dumbbells): 3 sets of 8 reps per leg
- Rest: 60 seconds between sets
- Cool-Down: Static stretches targeting legs and hips
Feel free to adjust the weights, reps, and sets based on your fitness level and goals.
Tips for Beginners
If you’re new to the Bulgarian split squat, don’t worry! Here are a few tips to help you get started:
- Start with Bodyweight: Focus on mastering the form before adding any extra resistance.
- Use a Mirror: Watching yourself perform the exercise can help you identify and correct form issues.
- Practice Balance: Spend a few minutes practicing the setup position to improve your stability before attempting the full squat.
- Go Slow: Take your time with each rep to ensure you’re performing the movement correctly.
With a little patience and practice, you’ll be rocking those split squats like a pro in no time.
Expert Insights and Research
According to a study published in the Journal of Strength and Conditioning Research, unilateral exercises like the Bulgarian split squat activate the muscles of the lower body more effectively than bilateral exercises like traditional squats. This makes them an excellent choice for athletes and fitness enthusiasts alike.
Additionally, research has shown that incorporating unilateral exercises into your routine can improve balance, reduce injury risk, and enhance overall athletic performance. So, if you’re looking to take your fitness to the next level, the Bulgarian split squat is definitely worth considering.
Conclusion: Crush Your Leg Day with Bulgarian Split Squats
And there you have it! The Bulgarian split squat is a powerful exercise that can transform your lower body strength, stability, and endurance. By following the steps outlined in this guide, you’ll be well on your way to mastering this move and reaping its many benefits.
So, what are you waiting for? Grab a bench, some weights, and get to work! And don’t forget to share your progress with us in the comments below. Who knows—you might just inspire someone else to give this incredible exercise a try.
Table of Contents
- What is a Bulgarian Split Squat Anyway?
- Why Should You Do Bulgarian Split Squats?
- Step-by-Step Guide: How to Do a Bulgarian Split Squat
- Common Mistakes to Avoid
- Benefits of Bulgarian Split Squats
- How to Progress Your Bulgarian Split Squats
- Sample Workout: Incorporating Bulgarian Split Squats
- Tips for Beginners
- Expert Insights and Research
- Conclusion: Crush Your Leg Day with Bulgarian Split Squats
Article Recommendations